


 |
Priority Popup This lets you indicate that your message is of higher or lower priority than a normal message. For most messages, this is just an empty box (normal priority). For details, see the section "Setting the Message Priority." |
 |
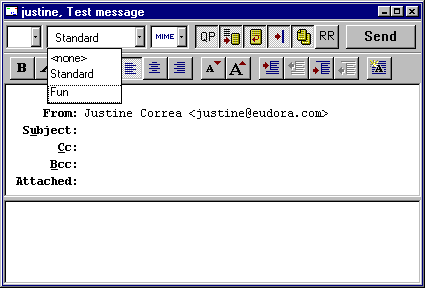
Signature Popup This lets you automatically append one of your signatures to the end of a message. For details, see the section "Using a Signature in an Outgoing Message." |
 |
Attachment Type Popup This lets you select the encoding format for attachments. For details, see the section "Attaching a File to a Message." |
 |
Quoted-Printable Encoding If this is on, quoted-printable encoding is used when sending messages that contain long lines of text or special characters. It is used for all plain text attachments. It is recommended that this always be on. |
 |
Text As Document If this is on, plain text files are attached to messages, not incorporated into the message as part of the message body. |
 |
Word Wrap If this is on, a carriage return is not required at the end of each line. When the message is sent, the text is automatically "wrapped," meaning that carriage returns are inserted at the end of each line of text, with roughly 76 characters per line. |
 |
Tabs in Body If this button is on, pressing the tab key within the message body inserts a tab. If this button is off, pressing the tab key within the message body returns the cursor to the To field of the message header. |
 |
Keep Copy If this is on, a copy of each sent message is kept in the Out mailbox. These messages are saved there until they are deleted or transferred. |
 |
Return Receipt If this is on, the message to your recipients includes a Notify Sender button that when clicked creates a message notifying you that the original message was viewed. This function does not work in all cases. For details, see the section "Requesting a Return Receipt." |

|
Send or
Queue These let you send a message immediately or put it in the queue to send later. If the Immediate Send option in the Sending Mail Options is on, the button is labeled Send. If the option is off, the button is labeled Queue. For details, see the section "Sending or Queueing a Message." |
| The following text formatting buttons are only available in the 32-bit version of Eudora. | |
 |
Bold Make the selected text bold. |
 |
Italics Make the selected text italic. |
 |
Underline Make the selected text underlined. |
 |
Font Make the selected text the selected font, size, and color. |
 |
Align Left Make the selected paragraph aligned to the left of the indent. |
 |
Align Center Make the selected paragraph aligned to the center of the indent. |
 |
Align Right Make the selected paragraph aligned to the right of the indent. |
 |
Smaller Make the selected text one standard point size smaller. |
 |
Bigger Make the selected text one standard point size bigger. |
 |
Indent In Make the selected paragraph indented once to the left. |
 |
Indent Out Remove one left indent for the selected paragraph. |
 |
Hang Indent In Outdent the first line of the selected paragraph. |
 |
Hang Indent Out Remove the outdent from the first line of the selected paragraph. |
 |
Clear Removes all the formatting from the selected text or paragraph. |
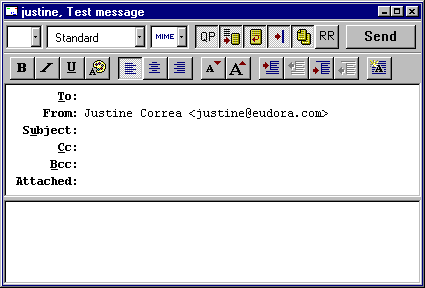
To
The
intended recipients' e-mail addresses, or nicknames you have defined
(see the section "Using the Address Book and Quick Recipient
List"). Multiple addresses and nicknames must be separated
by commas.
From
The
sender's e-mail address. This is usually your POP account plus
your real name. You can use a return address other than your POP
account by entering the address in the Return address field
of the Personal Info Options.
Subject
Some
brief text indicating the contents of the message. This field
can be left blank (though it is a breach of e-mail etiquette to
do so).
Cc
The
e-mail addresses or nicknames of people to whom a copy of the
message is to be sent. These recipients are displayed in the message
header for all recipients to see. Multiple addresses must be separated
by commas. This field can be left blank.
Bcc
The
e-mail addresses or nicknames of people to whom a copy of the
message is to be sent. These recipients are not displayed in the
message header, and the recipients in the To or Cc
fields will not know that a copy went to these addresses. Multiple
addresses must be separated by commas. This field can be left
blank.
This field can also be used to put a copy of the message in one of your mailboxes. To do this, right click in the body of the message and select the mailbox from the Fcc menu. The name of the mailbox is inserted into the Bcc field preceded by an "ƒ," and when the message is sent, a copy is put in that mailbox.
Attachments
A
list of documents being attached to and sent along with the message.
You must use one of the attachment options to add attachments
(see the section "Attaching a File to a Message"). To
delete an attachment from an outgoing message, select it and press
the delete key. This field can be left blank.
All the other options categories cannot be changed for alternate personalities-they are effective for all. However, alternate personalities are automatically set to use a Winsock connection and password authentication, regardless of how those options are set in the Getting Started and Checking Mail options.
If you want to change other options, or use a separate set of mailboxes for an account, see the section "Putting Multiple Users on One PC."
To create an outgoing message as an alternate personality, hold down the shift key and select one of the message creation commands from the Message menu (New Message, New Message To, etc.). The Message Options dialog is displayed.
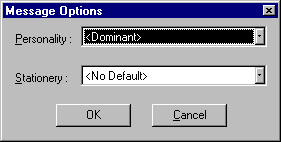
Note: The New Message With and Reply With commands will not display the Message Options dialog. If you want to open a stationery message with an alternate personality, use one of the other message creation commands to display the Message Options dialog.
Select the personality you want to use (and stationery if you want to), then click OK. The Composition Window is displayed, with the alternate personality as the sender (and any stationery text if applicable). The default signature for that personality is used, or if a stationery file is selected its signature is used. You can always change the signature popup in the composition window (for details, see the section "Using a Signature").
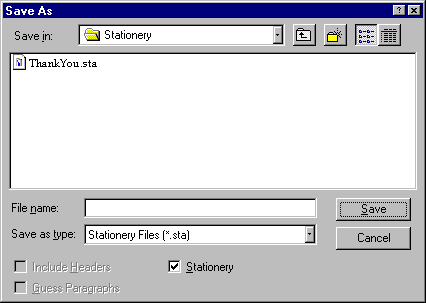
To create a stationery file, open a new message, put the text you want into the message body, fill in the headers as appropriate (subject, copies, etc.), and set the Toolbar. Select Save as... from the File menu to display the Save As dialog.
Select the Stationery option (if you are using 32-bit Eudora), then name the file and click on Save to save it. You can delete the original message. If you are using 16-bit Eudora, there is no Stationery option-you only need to name the file (be sure it has the .sta extension), all the options are set for creating stationery.
To change a stationery file, open a new message with the stationery file, make your changes, then use the Save As option again to save your changes. To delete a stationery file, remove it from the Stationery directory.
To send a stationery message, select a stationery file from the New Message With or Reply With submenus from the Message menu. A Composition Window is displayed containing the header and body from the stationery file. If you are replying to a message, the stationery information is added to the reply. You can edit and send this new message just as you would any other message.
To use a particular stationery file for all of your outgoing messages, select a stationery in the Sending Mail Options (only for your dominant account), or in the Personalities Options (for any of your personalities). Most new messages use this file, unless you create the message using the Redirect, Send Again, New Message With, or Reply With command.
You can also set up a filter to reply with a stationery message. See the section "Filtering Messages" for more information.
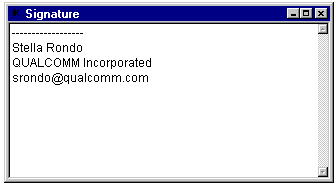
Note: Your signature is not displayed in the Eudora message window, but is added to the end of the message when it is sent.
To create or modify your Standard signature, select Standard from the Signatures submenu on the Tools menu. The Signature window is displayed. Enter your signature text, and select Save from the File menu to save your changes.
To create additional signatures, select
Signatures![]() New from the
Tools menu. An alert is displayed, asking you what you want to call it.
Enter a name and click on OK to display a signature window. Enter your
signature, save the file, and close the window. Your new signature is now part of
the list of signatures.
New from the
Tools menu. An alert is displayed, asking you what you want to call it.
Enter a name and click on OK to display a signature window. Enter your
signature, save the file, and close the window. Your new signature is now part of
the list of signatures.
To modify
an additional signature,
select Signatures![]() Name
from the Signatures submenu on the Tools menu.
The signature window is displayed for the signature you specified.
Make any changes you want, save the file, and close the window.
Name
from the Signatures submenu on the Tools menu.
The signature window is displayed for the signature you specified.
Make any changes you want, save the file, and close the window.
To delete a signature, select Delete from the Signatures submenu on the Tools menu. A dialog is displayed. Select the signatures that you want to delete, and click OK.
To include a particular signature in an outgoing message, select the signature you want from the Signature popup on the message toolbar.
To include a particular signature in all of your outgoing messages, select a signature in the Sending Mail Options (only for your dominant account), or in the Personalities Options (for any of your personalities). You can change this for a particular message by selecting a different signature or None from the Signature popup.
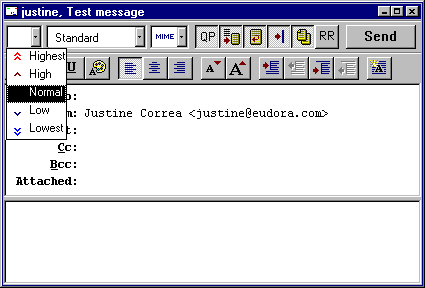
There are five priority levels available, 1 being the highest, 5 being the lowest. Each is represented by a small symbol in the Toolbar of a message window and the Priority column of a message summary. Priority 3 is used for messages that have no assigned priorities, and it is not displayed. The high and highest priority symbols are red.
New messages are created with a Normal priority. To change the priority of the current message, use the Priority popup.
Note: To set up Eudora to always use the sender's priority on your replies, turn on the Copy original's priority to reply option in the Replying Options. You can always change the priority in the message window.
When your recipients open the message then close it, a dialog is displayed asking them to create a notification message now, later, or never (if you sent yourself a copy, you will not get the notification request). If a recipient chooses to create a notification message, it is sent to you and tells you when the recipient displayed your message.
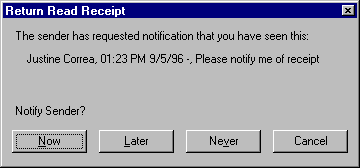
These Return Receipt options may or may not work as described, depending on your recipients' e-mail software.
It is important to remember that you cannot completely control what happens on your recipient's computer. Depending on the type of computer they are using, their installed fonts, their options or preferences, etc., they could end up viewing something different than what you intended. Also, the formatting changes you make are sent to your recipient, but your default text settings are not. Any text that you did not make changes to is displayed using your recipient's default text.
To format text, select the text you want to affect and use the buttons on the Toolbar (see the section "The Toolbar") or the Text commands from the Edit menu. You can change the font, size, style, color, and the margins.
It is a good idea not to include your own carriage returns within paragraphs if you have this option on. Only use carriage returns to create new paragraphs.
To manually wrap text, select the text you want, then select Wrap Selection from the Edit menu. To unwrap text, select the text you want, then hold down the Shift key and select Wrap Selection from the Edit menu.
To copy wrapped text without taking the carriage returns, hold down the Shift key and select Copy from the Edit menu.
To attach a file to an outgoing message, select Attach File [to New Message] from the Message menu. The Attach File dialog is displayed. Once the desired document is located, select it and click on the Attach button to attach the document to the messagemessage, or open a new message with the file attached. You can add as many attachments as you want to a message.
You can also drag one or more files from the Desktop onto the message window to attach them.
To detach a document before the message is sent, select the document in the Attachments field, then press the delete key or select Clear from the Edit menu.
When the message is sent, if the chosen document is not a plain text (ASCII) file, it is encoded in the selected attachment type. This allows you to send any kind of document through the mail, even applications.
If the document is an ASCII file, you can put it in the body of the message by turning off the Text as Attachment button in the message toolbar, or by turning on the Put text attachments in body of message option in the Attachments Option.
The attachment types include the following:
If you recieve a large message consisting largely of indecipherable text, it is probably an attachment that was not automatically decoded. Usually this is because the attachment headers are formatted incorrectly.
To decode an attachment that was not automatically decoded, open the message and select Save As from the File menu to save the message as a text file. Then run the decoding utility appropriate for the encoding method you used that the sender used. Decoding utilities can be found at various shareware sites on the Internet.
Note: Changes to the spell checking options can be made in the Options dialog (Check Spelling) or by selecting Options from the Check Spelling dialog.
See Appendix A for information on how to get dictionaries for languages other than U.S. English.
To automatically check spelling when you send or queue a message, turn on the Check when message queue/send selected option in the Spell Checking Options. If this is on, when you send or queue a message the message is checked for spelling errors. If you go through the spell checking process, the message is automatically sent or queued. If you click Cancel, or leave spelling errors in the message, a dialog is displayed asking you if you still want to send or queue the message. If you don't want that dialog to be displayed, turn on the Don't warn me anymore option (this can also be set in the Spell Checking Options).
To check the spelling of a current composition window, text file, or signature file, click on the Check Spelling button in the main window toolbar or select Check Spelling from the Edit menu. If there are no misspellings, the No misspellings found alert is displayed.
Note: If text is selected, Eudora only checks the spelling of the selected text. Otherwise, it starts the spelling check from the beginning of the message body or text file and checks the entire text.
If a misspelled, unknown, or repeated word is found, the Check Spelling dialog is displayed with the word listed in the Unknown field.
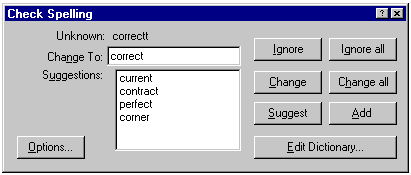
To correct the misspelled word, type the correct spelling of the word in the Change To field, select it from Suggestions list and click the Change button, or double-click it in the Suggestions list. The spelling checker then proceeds with the check.
Unknown Field
An
unknown word is one that is not found in Eudora's built-in dictionary
or your own custom dictionary. You can act on an unknown word
using the Ignore, Ignore all, Change, Change all, or Add buttons,
as described below.
Change To Field
This
field works in conjunction with the Change and Change all buttons.
It allows you to modify the unknown word by typing its correct
spelling in this field, or selecting a suggested alternative spelling
from the Suggestions field, and then clicking the Change or Change
all buttons, as described below.
Suggestions Field
This
field lists Eudora's suggestions for the correct spelling of the
unknown word. If the Always Suggest option is turned on, all
suggestions are listed here by default. If this option is turned
off, click the Suggest button to display Eudora's suggestions.
Ignore Button
This
button causes the spelling checker to ignore this occurrence of
the unknown word.
Ignore all Button
This
button causes the spelling checker to ignore this occurrence and
all subsequent occurrences of the unknown word.
Change Button
This
button substitutes to contents of the Change To field for the
unknown word.
Change all Button
This
button substitutes to contents of the Change To field for the
unknown word, and all subsequent occurrences of the unknown word.
Suggest Button
This
button displays Eudora's suggestions for the correct spelling
of the unknown word in the Suggestions field.
Note: If Eudora doesn't have suggestions in its dictionary, then none are listed.
Add Button
This
button adds the unknown word to your custom user dictionary.
Edit Dictionary Button
This
button displays the Edit User Dictionary dialog.
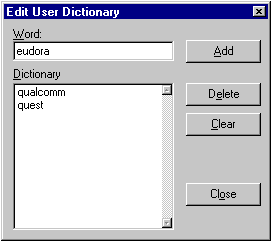
The Edit User Dictionary dialog lists all of the words in your user dictionary in the Dictionary field. It also allows you to add words to or delete words from your personal user dictionary, or even clear the entire dictionary.
Note: Words in the user dictionary are saved in all lower case.
To add a word to the dictionary using this dialog, type the correct spelling of the word in the Word field and click the Add button. The word is then added to the dictionary and displayed in the Dictionary field.
Note: The Add button in this dialog works the same as the Add button in the Check Spelling dialog.
To remove a word from the user dictionary, type it in the Word field or locate it in the Dictionary field and single-click on it to display it in the Word field. Then, click the Delete button.
To delete the entire user dictionary, click on the Clear button. You will then be prompted to confirm the deletions. If you click Yes, all of the words are deleted from the user dictionary.
Options Button
This button displays
the spell checking Preferences dialog.
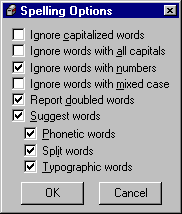
Spell checking Preferences dialog
The spell checking Preferences dialog lists the six spell checking options. A check mark in the box next to the option name indicates that it is turned on.
Note: The spell checking options can also be modified in the Options dialog (Spell Checking).
The available options are as follows:
Note: If Eudora doesn't have suggestions in its dictionary, then none are listed.
 )
in the Status column. This indicates that the message has been
saved and can be sent or queued.
)
in the Status column. This indicates that the message has been
saved and can be sent or queued.
You can continue making changes or close the message. If you try to close an outgoing message window without saving that version of the message, an alert is displayed asking if the message should be saved or the changes discarded. If you select Discard and the message has never been saved, the message is deleted.


Copyright 1996 QUALCOMM Incorporated. All Rights Reserved.
