
Most Eudora commands can be applied either to an open message window or to highlighted message summaries in a mailbox window. This lets you apply commands (such as Transfer, Forward, and Reply) to messages without opening them first. Whenever the term current message is used in this manual, it refers to a message that is open and is in the topmost window or whose message summary is highlighted within a mailbox window.
From the Message menu, select New Message. A new composition window is displayed. Since it is easiest to experiment with Eudora by sending a message to yourself, type your own e-mail address in the To field.
The From field has been automatically filled in and can't be altered. This is your real name and return address (as entered in the Real name and Return address fields in the Personal Information Options).
Press the tab key or point and click the mouse to move the cursor down to the Subject field. Typically, you would enter some brief text indicating what the message is about. For this message, type the words Test Message.
Move the cursor past the remaining Cc, Bcc, and Attachments fields down into the large area below them. This area is reserved for the body of the message. Here you can type whatever text you want. When you finish your message (referred to in this tutorial as your test message), the composition window should look something like the following example.

After you save your test message, select Out from the Mailbox menu to view the message summary. The bullet () in the Status column of the message summary indicates that the message has been saved, and can be sent or queued.

The composition window immediately closes, and the pProgress window is momentarily displayed at the top of the screen. The progress window shows you the progress of lengthy operations.
Your password is requested for the first mail check after Eudora is opened, whether it is an automatic or manual check.
Note: Your POP account password is provided by your e-mail administrator.

Type in your password and click OK. If you make a mistake before clicking OK, simply backspace and re-enter the password correctly. If your password is rejected, select Check Mail from the File menu again and re-enter your password.
Note: Your Eudora password is case-sensitive, so the uppercase and lowercase letters must be typed in exactly. Be sure Caps lock is off.
After successfully entering your password, a progress window is momentarily displayed at the top of the screen indicating that an attempt to reach your POP account is being made. If there is a network problem between you and the POP server, an alert is displayed. Consult with your e-mail administrator to solve the problem.
If there is no mail waiting at your account on the POP server, the You have no new mail alert is displayed. This means that the message you sent to yourself in the previous exercise has not been delivered to your POP account yet. Click OK.
Keep selecting Check Mail from the File menu until your test message arrives. If the message doesn't arrive in a minute or two, notify your e-mail administrator.
When mail is found in your POP account, it is transferred to your PC and the progress window lets you monitor the transfer. This is followed by the You have new mail alert .
Click OK. The In mailbox window is displayed with your test message summary listed inside.

The mailbox window shows a summary of each message in the mailbox. Incoming messages are stored indefinitely in the In mailbox until they are deleted or transferred to another mailbox (as described later in this tutorial).
To select (highlight) the message summary, click anywhere on the summary. To open the message, double-click on its summary. Do this for your test message to display it on your screen.

With the test message current, select Reply from the Message menu to initiate a reply to the message.
A new composition window is displayed, with the sender's address (in this case, your own) automatically placed in the To field of the header. The original sender's text is automatically included in the body of the message. You can edit this text as needed (or it can be deleted by pressing the Delete key). You can enter more text in the reply message just as in any outgoing message. In your test reply, move the insertion point to the area below the original message and type in some additional text. To send this message, click Send.

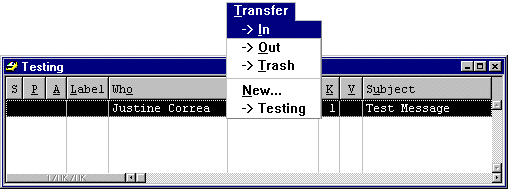
To create a new mailbox and transfer your test message into it, open the In mailbox, select your test message summary, and select New... from the Transfer menu. The New mailbox dialog is displayed. Any name can be typed in the new mailbox title field, but for this example, type Testing.

Click OK to create the new mailbox. Because your test message was highlighted when you selected New... from the Transfer menu, it is automatically transferred into the Testing mailbox. To see this, select Testing from the Mailbox menu.
You can also transfer messages among existing mailboxes. To do this, select your original test message from the Testing mailbox and then select In from the Transfer menu.

Transferring the test message
To delete your test message, open it or select it in the In mailbox. Then, select from the Message menu. As a safeguard, the Delete command doesn't actually delete messages, but instead transfers them to the Trash mailbox. So, if you suddenly realize that you deleted a message you want to keep, you can transfer it out of the Trash into another mailbox.
All messages stored in the Trash mailbox are automatically deleted when you quit Eudora (although you can turn this option off). To manually delete messages in the Trash mailbox, select from the Special menu.
Copyright 1996 QUALCOMM Incorporated. All Rights Reserved.