To put a message in the Trash, select the message then select Delete from the Message menu, or select Trash from the Transfer menu, or press the delete key. The message is transferred to the Trash mailbox.
To delete the messages in the Trash mailbox (removing them permanently from your PC), select Empty Trash from the Special menu.
You can set up Eudora to warn you if you try to delete unread, queued, or unsent messages. To do this, use the Extra Warnings Options to turn on those options.
Quitting Eudora empties the contents of the Trash mailbox when the Empty Trash when exiting option in the Miscellaneous Options is turned on. Finally, if you want to delete just a few messages from the Trash mailbox, select them, then select Delete from the Message menu or press the delete key. Deleting a message from the Trash removes it completely.


To put a copy of a message in another mailbox (instead of transferring the message), hold down the Shift key and use one of the transfer options above. This is useful if you want to file a message in more than one mailbox.
If you try to transfer a message to the Out mailbox, an alert is displayed informing you that some header information may be removed from the message during transfer. Click Yes to transfer the message.
Note: You can undo mailbox transfers using the Undo command under the Edit menu.
To drag a message summary to another mailbox, select the message summary (or summaries) and drag the summary into any open or minimized mailbox window, or (if you are using the 32-bit version) any mailbox in the Mailboxes window. When you release the mouse button, the message is transferred.
To drag an open message to another mailbox, hold down the mouse over the Tow Truck icon and drag the message into any open mailbox or (if you are using the 32-bit version) any mailbox in the Mailboxes window. When you release the mouse button, the message is transferred.
Note: You can only drag messages around if the Allow drag and drop transfers option is on in the Miscellaneous Options.
You can create a new mailbox or mail folder (for details, see the section "Creating Mailboxes and Folders"). When you are done, the current message is transferred into the new mailbox.
To create the new mailbox without transferring the message into it, check the Don't transfer, just create mailbox option.
To open the Filters window, select Filters from the Tools menu. The Filters window is displayed, and any filters you have created are listed on the left.
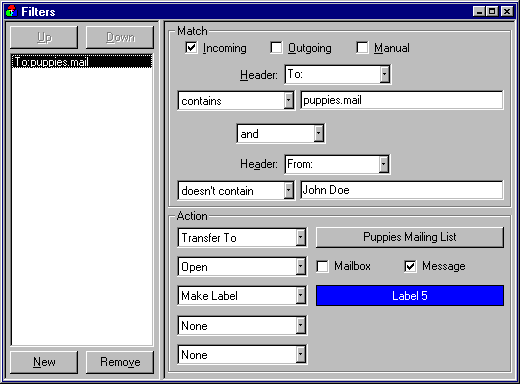
To create or modify a filter, first click on the New button or select an existing filter.
Second, select the options for how you want the filter to be used: as an automatic filter to be invoked on any Incoming and/or Outgoing mail, and as a Manual filter that can be invoked when you select Filter Messages from the Special menu. Any combination of these options works.
Third, define the criteria for the filter: use the header item popups and the text fields to specify which header items should include a particular string of text. You can define two related terms for the criteria so that your filter is as specific as possible (see the section "Filter Criteria").
Fourth, Define the action to be taken on messages that fit the criteria (see the section "Filter Actions") and save the filters.
Note: Filters are automatically named based on the criteria for the filter. You can re-order them using the Up and Down buttons above the list.
When the filters are invoked (automatically or manually), each message is matched against each filter in order from top to bottom. If the message meets a filter's criteria, the actions are done as specified until there are no more actions, then the message is matched against the next filter. If at any point a Skip rest action is done, nothing else is done with that message, and the next message is filtered.
You can change the width of the filters list to create more or less space for your list. To do this, put the arrow over the bar to the right of the list and drag the line to the left or right.
Use the Header field to specify which message header items you want the filter to search. You can select an option from the popup menu or enter one yourself. This is helpful if you want to use a header item that does not appear on the menu, such as (for an alternate personality). The selections are as follows:
The «Any Recipient» option searches all possible recipient items (To, Cc, Bcc), the «Any Header» option searches all message headers (including hidden headers that are shown with the Blah Blah Blah option), and the «Body» option searches the message body.
Use the Match Type popup to control how the header item is matched with the text string in the text field. The match options are:
Contains or
does not contain
If
the specified header item contains or does not contain the text
string, filter the message.
is or is not
If
the specified header item is or is not a complete match of the
text string, filter the message.
starts with or
ends with
If the specified
header item starts with or ends with the text string, filter the
message. The starts with item refers to the first non-whitespace
character after the colon, so any spaces after the colon are ignored.
appears or
does not appear
If
the header item appears or does not appear in the message, filter
the message (the text field is ignored). This is useful for filtering
messages based only on the types of fields they contain.
intersects nickname
If
the text string is included in a nickname (whether it is a full
address or a nickname within the nickname), filter the message.
Use the Text fields to specify the text strings that the filter is searching for.
Note: It is recommended that the contents of this field be kept as specific and brief as possible. The greater the complexity, the less the likelihood of a match.
Use the Conjunction popup to link the two terms. The conjunction options are:
ignore
Ignore
the second term; if the message matches the first term, filter
the message.
and
If
the message matches both the first and second terms, filter it.
or
If
the message matches either term, filter it.
unless
If
the message matches both the first and second terms, do not filter
it. (This lets you exclude certain variations of the first term.)
The Action options are as follows:
None
No
action.
Make Status
Assigns
the selected status to message summaries.
Make Priority
Assigns
the selected priority level to messages. If you select a set level,
messages are set to that priority. If you select Raise
or Lower, messages are raised or lowered one priority level
based on their pre-filter level.
Make Label
Assigns
the selected label to messages.
Make Subject
Assigns
the new subject to message summaries (does not affect the suject
in the message itself). If you choose this option, the entire
subject of the message is replaced with the new subject. Use the
"&" symbol if you want to add the new subject to
the old subject. For example, entering New Subject:&
results in New Subject:Old Subject.
Play Sound
Plays
the selected sound when messages are received.
Open
Opens
the Mailbox and/or Message when a message is received.
If you set a previous action to filter messages into a mailbox,
then that mailbox is opened.
Print
Prints one copy of each message.
Notify User
Notifies
you As normal and/or In report when messages are
received. The As normal option notifies you based on the
options you have selected in the Getting Attention Options. The
In report option notifies you by displaying a filter report
that details what filter actions have been done.
Notify Application
Notifies
the selected application when messages are received, and provides
information from the message. Specify the application to use and
the part of the message to be included.
Use the Browse button to select an application, or enter the commandline yourself. The commandline should include the path to the executable, any options, and the following substitution variables, all separated by blank spaces:
%1 Date
%2 To
%3 From
%4 Subject
%5 Cc
%6 The entire message
For example, the commandline to send the subject of a message to a pager might look like this:
C:\apps\pager.exe -c %4
Forward To
Forwards
messages to the e-mail address given. Forwarded messages are placed
in the queue in the Out mailbox, and sent the next time you send
queued messages.
Redirect To
Redirects
messages to the e-mail address given. Redirected messages are
placed in the queue in the Out mailbox, and sent the next time
you send queued messages.
Reply With
Replies
to messages with the selected stationery message.
Replies are placed in the queue in the Out mailbox and sent the
next time you send queued messages.
Server Options
Sets
the message's server action to Fetch and/or
Delete (see the section "Managing Your
Mail on the POP Server").
Copy To
Copies
messages to the selected mailbox.
Transfer To
Transfers
messages to the selected mailbox.
Skip Rest
Stops
filtering for the message (the message is not matched to the rest
of the filters in the list).
Mailboxes are sorted based on the previous state of the mailbox. For example, if a mailbox is sorted by date, and then you sort by sender, the messages are grouped by sender and each group is in order by date.
Note: Sometimes sorting by Date can be incorrect. This usually happens if the messages have incorrectly formatted date fields, or unknown or incorrect time zones.
Type the text you want to find in the text field. When finished entering the desired text, click the Find button.
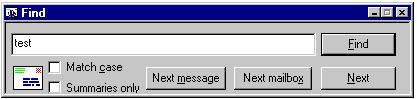
Starting at where the cursor is in the message, Eudora searches the current message for the specified text. If no match is found, the not found alert is displayed.
If the search is successful, the message is scrolled to the first point where the match is found and the matching text is highlighted.
To continue searching in the same message for the next occurrence of the text, click the Find button in the Find dialog, or select the Find Again command from the Find submenu. These commands are equivalent and limit the search to the same message. Repeating these commands cycles through the matches in the open message only.
Next
The
Next button (or Next command) allows you to search for the next
match of the specified text until it is found either in the same
message or in one of the following messages in the current mailbox.
Next Message
The Next
Message button (or Next Message command) begins the search at
the message after the current message. Eudora continues to search
until it finds a matching character string, even if it has to
open more than one message or a new mailbox.
Next Mailbox
The Next
Mailbox button (or Next Mailbox command) begins the search for
the specified text in the mailbox following the current mailbox.
The search is conducted among all messages in that mailbox and
any subsequent mailboxes, including the In, Out, and Trash mailboxes.
Note: Mailboxes are searched in the order they are listed under the Mailbox menu until the current mailbox is reached. When the character string is found in a message, the message is displayed. Ctrl+ double-click on the message title bar to open the mailbox that contains the message.

Enter the name you want to give the text file, and select the appropriate options.
Important: Be sure to change the Save as type: option to Text Files.
Guess Paragraphs removes extraneous carriage returns from the message, leaving returns only at the ends of paragraphs, and converts multiple spaces into tabs.
Include Headers retains the first message's header information in the saved document. If this is not checked, only the body of the messages is saved.
Stationery saves the message as a "stationery" file (if you are saving an incoming message, this option is not available). For details, see the section "Using Stationery Messages."
Once you've made all of your choices, click on the Save button in the dialog.
Note: If an unread () message is saved to a file, its status changes to read, regardless of whether the message was opened.
If you select multiple messages from a mailbox window and select Save As..., all of the messages are saved to a single file.


Copyright 1996 QUALCOMM Incorporated. All Rights Reserved.