To open your Address Book, select Address Book from the Tools menu.

All of the Address Book entries are kept in files. The example above shows files for Business, Family, and Friends (Eudora Nicknames is the default file). In the 32-bit Address Book, you can show or hide the entries in a file by double-clicking on the file. The icon shows an open or closed book, depending on whether the file is open or closed. In the 16-bit Address Book, files are flush to the left, and their entries are listed under them.
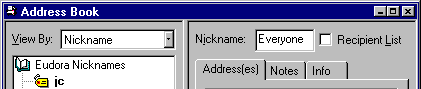
You can use the View By option to display the entries using any of the fields except the Notes field. For example, if you want to view the entries by nicknames, select View By Nicknames. If you view by a field that doesn't contain any data, the entry is displayed with «».
You can also start typing in the list of entries, and the appropriate entry will be selected when you enter enough unique characters to identify it.
To page up and down in the list of entries, use the arrow keys. To resize the list, drag the divider.
To open and close the right-hand side of the Address Book, use the open and close buttons.
Enter a name for the file and select Make it a file, then click OK to create it. The file is displayed in the list, and you can now add entries to the file.
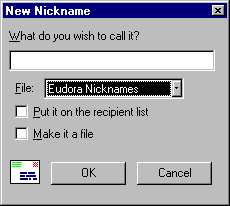
To create a new entry to be included in an existing file, do one of the following: click on New in the Address Book, select an address from anywhere in Eudora and drag it to the Address Book, or drag a message summary to the Address Book.. A dialog is displayed. Enter a for the entry. A Nickname (sometimes called an alias) is an easily remembered, shorter substitute for the e-mail addresses in the entry. Nicknames can be used in place of proper e-mail addresses in the To, Cc, and Bcc fields of outgoing messages.
Specify which file this entry belongs in (if you have multiple files), and select the Put it on the recipient list option if you want the nickname on your list. You cannot create a file within a file, so do not use the Make it a file option. Click OK to create the entry. Then you can enter the information for that entry.
In the Address(es) tab, enter the complete e-mail addresses of the people (or person) to be included in the nickname, separating the addresses with commas or returns (this is the only place you can use a return to separate addresses). You can also use nicknames in this field, but be sure that any nicknames you use are defined in their own entry. You can use a mix of nicknames and complete e-mail addresses.
Note: Be sure there is no other information in this field except addresses or nicknames, or your messages will be addressed incorrectly.In the Name field (in the Info tab), enter the real name of the person or group. If there is just one address for the entry, the real name and the address are included in the To field for your recipient to see. If there is more than one address for the entry, the real name is the only thing included in the To field for your recipients-they do not see the whole list of recipients. If there is nothing in the Name field, the recipients do see the whole list.
In the other fields provided in the Info (Phone, Fax, and Postal Address) and Notes tabs, you can enter contact information for the person or group, and any notes to yourself. This information is not included in outgoing messages.
It is recommended that you have at most 2,500 entries per file. If you have a large number of entries, you may want to consider using a Ph server (for information, see Appendix A).
To save your changes to the Address Book, select Save from the File menu.
Important: If you change a nickname, but sure to correct any entries that reference that nickname.
To move or copy an entry to a file, right-click on it and select the Move To or Copy To command. The Choose a Nickname File dialog is displayed so that you can select the file you want to move the entry to.
In the 32-bit version, you can move an entry (or entries) to a different file by dragging it, or copy it by holding down the Shift or Ctrl key then dragging it.
Note: You cannot move an entry into the file it is already in, but you can copy an entry into its file (a �Copy of Entry� is created).
To delete an entry or an address file, select it from the list and click on the Del button or press the Delete key. You cannot remove the Eudora Nicknames file.
Note: If a nickname file is set to read-only (you do not have permission to write to it), you cannot move or copy entries into it., or delete an entry from it.
To save your changes, select Save from the File menu.
If you change a nickname or remove an entry, the Quick Recipient List is updated as appropriate. For details about using the Quick Recipient List, see the section "Using the Quick Recipient List."
Note: You can add or remove multiple nicknames to or from the Quick Recipient List by selecting multiple entries. Hold down the Shift key to select multiple entries in sequence, or the Ctrl key to make disjoint selections.
To create a new message from the Address Book, select the entry to which you want to address the mail (hold down the Shift key to select multiple entries in sequence, or the Ctrl key to make disjoint selections). Then click on To, Cc, or Bcc. A new composition window is displayed with the selected nickname(s) inserted in the appropriate field.
Note: You can also double-click on an entry to enter that nickname in the To field.
To address the message with the addresses in the Address(es) field (instead of the nickname), turn on the Expand Nicknames option .
Once the composition window is displayed, you can use the To, Cc, and Bcc buttons to insert additional nicknames into the corresponding fields.
In the Address Book, highlight several different entries (hold down the Shift key to select multiple entries in sequence, or the Ctrl key to make disjoint selections), then select Make Address Book Entry... from the Special menu. The New Nickname dialog is displayed prompting you for the nickname of the new entry. The Address(es) field of the new entry will include the nicknames for the entries you selected, not the real addresses.

In a mailbox, highlight the message summaries you want and select Make Address Book Entry... from the Special menu. The New Nickname dialog is displayed prompting you for the nickname of the new entry. Follow the instructions for creating a new entry. If the current message is an outgoing message, the new entry will include all of the addresses in the To, Cc, and Bcc fields. If the current message is an incoming message, the new entry will include the address in the From field. If multiple messages are current (i.e., you have several message summaries selected in a mailbox window), addresses are taken from each message and are all put in the new entry.
Note: The Make Address Book Entry command uses the Reply Options. If the Include yourself option is on, your address is included in the new entry.
In the Directory Services window, finish a Ph query, select the items that you want to include in the entry (or do not select anything to use all of the items), and select Make Address Book Entry... from the Special menu. The New Nickname dialog is displayed so that you can name the nickname. The real name and e-mail address are included in the new entry.
To insert the real addresses for the entry, instead of the nickname, hold down the Shift key and select from the Edit menu. To set this to happen all the time, turn on the Automatically Expand Nicknames option in the Miscellaneous Options.
First, be sure the files are plain text, have a .txt extension, and are formatted as follows: One nickname on each line with the real addresses separated by commas, and one line for notes and info with the Notes text following the Info data. For example:
alias
Wow joe@wow.com,lisa@wow.com,chris@wow.com
note Wow <fax: 222.2223><phone: 222.2222><address:1234 Street>
<name:Wow Inc.>My favorite company
Then, for each client application, add a ExtraNicknameDirs entry to the [Settings] section of the EUDORA.INI file. This entry should be followed by the list of directories that contain Address Book files, separated by semicolons (;). Any Address Book files located in those directories are added to the Address Book. Users will need to exit and re-open Eudora to see the new entries.


To add a nickname to the Quick Recipient List, check the Recipient List option in its Address Book entry.
To add a e-mail address to the Quick Recipient list, select the text that makes up the full address. Then, select Add As Recipient from the Special menu.
To remove an entry from the list, uncheck the Recipient List option in the Address Book entry, or select the nickname from the Remove Recipient submenu from the Special menu.
To open a new message addressed to someone on your Quick Recipient List, select New Message To, Forward To, or Redirect To from the Message menu, and select the nickname from the displayed list.
To insert a recipient into a message that you have already opened, put the cursor where you want the recipient and select Insert Recipient from the Edit menu.
To insert the real address(es), instead of a nickname, hold down the Shift key and select Insert Recipient from the Edit menu. To set this to happen all the time, turn on the Automatically Expand Nicknames option in the Miscellaneous Options.
More than one recipient from the Quick Recipient List can be added to the To, Cc, and Bcc fields of any message. If you use the Insert Recipient command, commas are added where necessary.
To insert the real address(es), instead of the nickname, hold down the Shift key and select Insert Recipient from the Edit menu. To set this to happen all the time, turn on the Automatically Expand Nicknames option in the Miscellaneous Options.


Copyright 1996 QUALCOMM Incorporated. All Rights Reserved.